Now, I prefer adding it through Eclipse because of the simplicity of using a couple of wizard screens which are pretty easy to use.

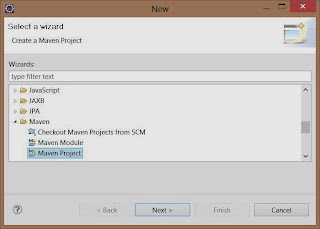
First, you will want to open the "New Maven Project Wizard". To do this, click 'File'->'New'->'Other'. This opens the "New Item Wizard". Once the wizard is open, type "Maven" in the filter input box or scroll to the Maven heading and open the toggle to see the option for the "Maven Project" wizard.
Click "Next" to open the "Maven Project" wizard.
The first screen of this Wizard gives you an option to select a Maven project archetype, essentially a project template, on your own (left unchecked) or to make a "Simple Maven Project" by skipping the archetype selection. This will work to get you a Maven project started. Unless you know or are told to use a specific archetype it is just advisable to skip archetype selection by checking the box.
Click "Next" to advance to the next step of the wizard.
 On the next screen, most of the important settings will be made regarding the project. The first box is the "Group Id". The "Group Id" is the base package for your project. It is not the project name. For our default package, let's set ours to "com.blogspot.howdoidoitinjava". "Next, the "Artifact Id" should be entered. This is basically the project name identifying the Maven project. It should not contain spaces. In our example, we have selected "NewMavenProject". You can opt to change the Version text to your liking. This can be modified in the pom.xml used for Maven goal execution at any time and most likely will change from one release to the next. The last input we will discuss is the packaging option. We have selected "jar" but if we were packaging it for a web application, we could select "war" to generate a '.war' file. When selecting 'jar' it is not an executable jar. There are modifications necessary to the pom.xml file to make this happen but are not in the scope of this discussion.
When done, click "Finish". Eclipse will now create the necessary project folder, artifacts and Maven-defined directory structure. When the wizard completes, the project will appear in the Projects tab in Eclipse.


No comments :
Post a Comment
All comments are moderated. NO ADS. NO SPAM.